开始
从Launcher点击一个App图标,会触发如下动作:
@Override
protected void onListItemClick(ListView l, View v, int position, long id) {
  Intent intent = intentForPosition(position);
  startActivity(intent);
}
走到了 Activity.java 的startActivity相关方法:
@Override
public void startActivity(Intent intent) {
  this.startActivity(intent, null); // 调用下一个方法
}

@Override
public void startActivity(Intent intent, @Nullable Bundle options) {
  if (options != null) {
    startActivityForResult(intent, -1, options);
  } else {
    // Note we want to go through this call for compatibility with
    // applications that may have overridden the method.
    startActivityForResult(intent, -1);
  }
}

public void startActivityForResult(@RequiresPermission Intent intent, int requestCode) {
  startActivityForResult(intent, requestCode, null);
}

public void startActivityForResult(@RequiresPermission Intent intent, int requestCode,
                                   @Nullable Bundle options) {
  if (mParent == null) {
    options = transferSpringboardActivityOptions(options);
    // 关键代码
    Instrumentation.ActivityResult ar =
      mInstrumentation.execStartActivity(
      this, mMainThread.getApplicationThread(), mToken, this,
      intent, requestCode, options);
    //
    if (ar != null) {
      mMainThread.sendActivityResult(
        mToken, mEmbeddedID, requestCode, ar.getResultCode(),
        ar.getResultData());
    }
    if (requestCode >= 0) {
      mStartedActivity = true;
    }

    cancelInputsAndStartExitTransition(options);
    // TODO Consider clearing/flushing other event sources and events for child windows.
  } else {
    if (options != null) {
      mParent.startActivityFromChild(this, intent, requestCode, options);
    } else {
      // Note we want to go through this method for compatibility with
      // existing applications that may have overridden it.
      mParent.startActivityFromChild(this, intent, requestCode);
    }
  }
}

public void startActivityFromChild(@NonNull Activity child, @RequiresPermission Intent intent, int requestCode, @Nullable Bundle options) {
  options = transferSpringboardActivityOptions(options);
  Instrumentation.ActivityResult ar =
    mInstrumentation.execStartActivity(
    this, mMainThread.getApplicationThread(), mToken, child,
    intent, requestCode, options);
  if (ar != null) {
    mMainThread.sendActivityResult(
      mToken, child.mEmbeddedID, requestCode,
      ar.getResultCode(), ar.getResultData());
  }
  cancelInputsAndStartExitTransition(options);
}
由代码了解到,调用startActivity最终都会走到startActivityForResult方法。startActivityForResult的作用是,如果想在Activity中得到新打开的Activity关闭后返回的数据,就要用这个方法。但因为这里传入的requestCode是-1,所以不会返回结果。
这个函数首先会判断要启动的Activity是否是子Activity,如果不是,就会调用execStartActivity函数。反之,调用startActivityFromChild函数。不过在startActivityFromChild中依然是执行到execStartActivity方法中去。区别是参数传递的父类对象。
Instrumentation
Instrumentation之前在 ActivityThread 有提到过,它和Activity有些类似。它主要作用是连接Activity/Application的中间层,也就是启动Activity,包括生命周期都不是直接调用的,而是通过instrumentation作为中介调用,这样它就具有了监控App的能力。使用Instrumentation框架可以进行对App的自动化测试,精准控制Activity。
调用execStartActivity方法传入一个mMainThread.getApplicationThread()参数,这个mMainThread是个ActivityThread,在Activity.attach时拿到的。因为此时还在桌面界面启动,所以还处在Launcher进程中,所以是Launcher的主线程。另一个参数是mToken,是IBinder类型的对象。这里由于还是在Launcher进程,所以这个mToken也是在启动Launcer时的attach方法中创建。
public ActivityResult execStartActivity(
  Context who, IBinder contextThread, IBinder token, Activity target,
  Intent intent, int requestCode, Bundle options) {
  IApplicationThread whoThread = (IApplicationThread) contextThread;
  Uri referrer = target != null ? target.onProvideReferrer() : null;
  if (referrer != null) {
    intent.putExtra(Intent.EXTRA_REFERRER, referrer);
  }
  if (mActivityMonitors != null) {
    synchronized (mSync) {
      final int N = mActivityMonitors.size();
      for (int i=0; i= 0 ? am.getResult() : null;
          }
          break;
        }
      }
    }
  }
  try {
    intent.migrateExtraStreamToClipData();
    intent.prepareToLeaveProcess(who);

    // 通过binder将处理从launcher进程切换到ActivityManagerService
    int result = ActivityManager.getService()
      .startActivity(whoThread, who.getBasePackageName(), intent,
                     intent.resolveTypeIfNeeded(who.getContentResolver()),
                     token, target != null ? target.mEmbeddedID : null,
                     requestCode, 0, null, options);
    checkStartActivityResult(result, intent);
  } catch (RemoteException e) {
    throw new RuntimeException("Failure from system", e);
  }
  return null;
}
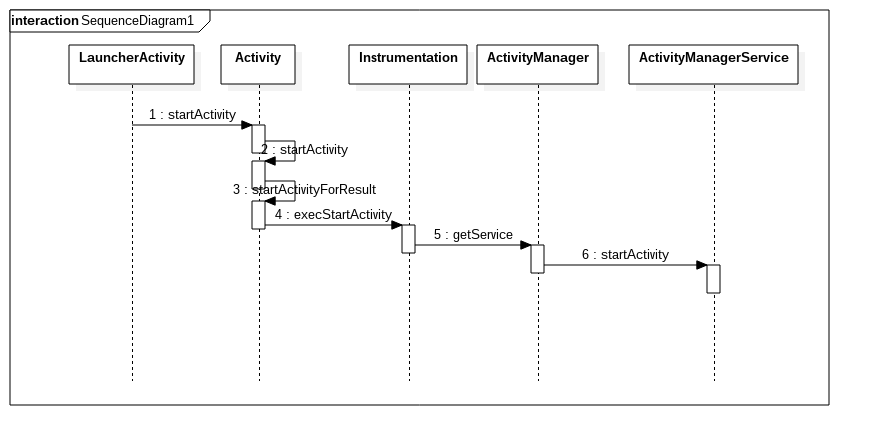
方法执行过程见注释。下面是时序图:
Server代码流程
ActivityManagerService.startActivity
@Override
public final int startActivity(IApplicationThread caller, String callingPackage,
                               Intent intent, String resolvedType, IBinder resultTo,                                    String resultWho, int requestCode,
                               int startFlags, ProfilerInfo profilerInfo, Bundle bOptions) {
  return startActivityAsUser(caller, callingPackage, intent, resolvedType, resultTo,
                             resultWho, requestCode, startFlags, profilerInfo, bOptions,
                             UserHandle.getCallingUserId());
}
为了适配多用户,直接调用startActivityAsUser方法。
ActivityManagerService.startActivityAsUser
@Override
public final int startActivityAsUser(IApplicationThread caller, String callingPackage,
                                     Intent intent, String resolvedType, IBinder resultTo,                                         String resultWho, int requestCode,
                                     int startFlags, ProfilerInfo profilerInfo, Bundle                                          bOptions, int userId) {
  enforceNotIsolatedCaller("startActivity"); // 验证CallingUid
  userId = mUserController.handleIncomingUser(Binder.getCallingPid(),Binder.getCallingUid(),
                                              userId, false, ALLOW_FULL_ONLY,                                                             "startActivity", null);
  // TODO: Switch to user app stacks here.
  return mActivityStarter.startActivityMayWait(caller, -1, callingPackage, intent,
                                               resolvedType, null, null, resultTo,                                                        resultWho, requestCode, startFlags,
                                               profilerInfo, null, null, bOptions, false,                                                  userId, null, "startActivityAsUser");
}
参数说明
caller,调用者。这里是Launcher的所在进程。如果是am start启动的,就是为null
intent,要启动的intent。包含Action,Categories,Component
resultTo,启动一个应用后负责接收返回结果的binder
callingPackage,启动当前activity的应用包名,此处是Launcher包名
这里,通过调用enforceNotIsolatedCaller()判断当前的请求者Binder.getCallingUid()是否允许启动Activity。
handleIncomingUser()会校验userSerialNumber,用户是否匹配,userSerial检查Number是什么意思?它是配合多用户新引入的引入userSerialNumber来标识用户。
这个方法中最关键的就是mActivityStarter.startActivityMayWait
ActivityStarter.startActivityMayWait
贴一部分代码 ActivityStarter.java
这是一个预处理函数,列举一下主要功能:
// Collect information about the target of the Intent.
ActivityInfo aInfo = mSupervisor.resolveActivity(intent, rInfo, startFlags, profilerInfo);
这个mSupervisor是 ActivityStackSupervisor.java 类。首先从rInfo拿到aInfo(这个方法经过AMS对aInfo做了一些处理)
ActivityStackSupervisor.ActivityContainer container =                                                     (ActivityStackSupervisor.ActivityContainer)iContainer;
final ActivityStack stack;
if (container == null || container.mStack.isOnHomeDisplay()) {
  stack = mSupervisor.mFocusedStack;
} else {
  stack = container.mStack;
}
这里使用当前stack,if条件判断当前是不是在主屏幕上显示,是分屏的雏形。因为当前应用没有启动起来,当前焦点stack是Home。下面就是最重要的部分:
int res = startActivityLocked(caller, intent, ephemeralIntent, resolvedType,
                              aInfo, rInfo, voiceSession, voiceInteractor,
                              resultTo, resultWho, requestCode, callingPid,
                              callingUid, callingPackage, realCallingPid, realCallingUid, startFlags,
                              options, ignoreTargetSecurity, componentSpecified, outRecord, container,
                              inTask, reason);
上面拿到的aInfo和一些参数都传入了startActivityLocked方法,而startActivityLocked内部处理部分参数,直接把参数传给startActivity方法。这个startActivity方法是一个重量级的函数,内容很多,下面看一下:
ActivityStarter.startActivity
ProcessRecord callerApp = null;
if (caller != null) {
  callerApp = mService.getRecordForAppLocked(caller);
  if (callerApp != null) {
    callingPid = callerApp.pid;
    callingUid = callerApp.info.uid;
创建一个空的ProcessRecord对象。然后先判断启动方式(caller不为空正常启动),然后调用getRecordForAppLocked获得一个ProcessRecord对象。
ProcessRecord 注释:Full information about a particular process that is currently running.
这里运行的是Launcher的进程,ProcessRecord记录的也是Launcher进程信息。
ActivityRecord sourceRecord = null;
ActivityRecord resultRecord = null;
if (resultTo != null) { // 接收返回结果
  sourceRecord = mSupervisor.isInAnyStackLocked(resultTo); // 拿到sourceRecord
  if (DEBUG_RESULTS) Slog.v(TAG_RESULTS,
                            "Will send result to " + resultTo + " " + sourceRecord);
  if (sourceRecord != null) {
    if (requestCode >= 0 && !sourceRecord.finishing) { // sourceRecord非结束状态
      resultRecord = sourceRecord;
    }
  }
}
这部分就是对应startActivityForResult和onActivityResult处理逻辑,sourceRecord就是源Activity的Record,另一个是目标Activity的Record。这里得到的sourceRecord就是Launcher的ActivityRecord。
后面的代码作用是:
- 启动标记的获得和检查
- 检查是否有启动any activity的权限
- 检查是否有启动当前请求的componentName的权限
- 检查权限后,然后判断是否要启动Activity
boolean abort = !mSupervisor.checkStartAnyActivityPermission(intent, aInfo, resultWho, requestCode, callingPid, callingUid, callingPackage, ignoreTargetSecurity, callerApp, resultRecord, resultStack, options);

abort |= !mService.mIntentFirewall.checkStartActivity(intent, callingUid, callingPid, resolvedType, aInfo.applicationInfo);
abort为true时,就会禁止启动某一个Activity。
ActivityRecord r = new ActivityRecord(mService, callerApp, callingPid, callingUid, callingPackage, intent, resolvedType, aInfo, mService.getGlobalConfiguration(), resultRecord, resultWho, requestCode, componentSpecified, voiceSession != null, mSupervisor, container, options, sourceRecord);
一个Activity启动的关键步骤:
- 找到它应该所在的Stack
- 建立一个ActivityRecord
- 建立TaskRecord
- 建立运行的进程ProcessRecord
当然这里是第一次运行一个Activity。如果是第二次运行,要涉及到task和process的复用。后面看情况讲。
然后还有一段关键条件检查,检查App是否允许进行切换。就是在使用某个App的时候来了一个电话,就会切换到电话界面:
if (!mService.checkAppSwitchAllowedLocked(callingPid, callingUid,
                    realCallingPid, realCallingUid, "Activity start")) {
    PendingActivityLaunch pal =  new PendingActivityLaunch(r,
                                   sourceRecord, startFlags, stack, callerApp);
    mPendingActivityLaunches.add(pal);
    ActivityOptions.abort(options);
    return ActivityManager.START_SWITCHES_CANCELED;
}
如果不允许切换,则存储起来,有机会再启动它。将保存到mPendingActivityLaunches中。
没有权限切换意味着当前显示的应用进行了stopAppSwitches。这个方法会使其他Task 的Activity无法显示在前端,但同一个Task中的Activity则不受制约。取消禁止切换使用 resumeAppSwitches。为了防止使用者不调用resumeAppSwitches,系统设置了一个超 时时间(5s),超时则自动resume。在resume中不会处理Pending起来的Activity,但超时会触发处理Pending的Activity。
这个startActivity执行完成之后,又会进入下一个startActivity的重载函数。
ActivityStarter.startActivityUnchecked
进入新的startActivity函数后,执行try catch里就会先执行
result = startActivityUnchecked(r, sourceRecord, voiceSession, voiceInteractor,
                    startFlags, doResume, options, inTask, outActivity);
在startActivityUnchecked中会连续执行几个很重要的逻辑函数
ActivityStarter.setInitialState
第一个执行setInitialState方法,做初始化。这个初始化有一段比较关键的代码:
// We'll invoke onUserLeaving before onPause only if the launching
// activity did not explicitly state that this is an automated launch.
mSupervisor.mUserLeaving = (mLaunchFlags & FLAG_ACTIVITY_NO_USER_ACTION) == 0;
我把官方注释也放上去了,这个是说,当启动标记未设置Intent.FLAG_ACTIVITY_NO_USER_ACTION时, mUserLeaving为true。关于Intent.FLAG_ACTIVITY_NO_USER_ACTION标记用于判断是否是用户的行为导致的Activity切换,比如当你按home键时,会切换 Activity,此时会回调onUserLeaveHint(),如果是来电导致的Activity切换,就不会调用onUserLeaveHint(),也就是说如何设置了这个标记就表明当前启动的行为是非用户行为。这样切换到后台的Activity便不会回调onUserLeaveHint()这个生命周期函数。
ActivityStarter.computeLaunchingTaskFlags
回到startActivityUnchecked方法,在执行完初始化函数后,接着执行computeLaunchingTaskFlags()方法。这个方法也有一个重要的代码段:
if (mSourceRecord == null && mInTask != null && mInTask.getStack() != null) {
    final Intent baseIntent = mInTask.getBaseIntent();
    final ActivityRecord root = mInTask.getRootActivity();
从最近任务栏启动开机恢复出来的activity时,会走这个逻辑,mInTask这个参数是5.0 上新增的一个参数,主要是处理任务栏相关的内容,当从最近任务栏启动“恢复的 Task”时,mInTask值是不为空的,但这时sourceRecord是为null 。当进入这个逻辑后,从mInTask中获得Intent和ActivityRecord对象,如果当前的获得的ActivityRecord对象为null时,这时候会重新调整启动flag参数、task的复用等一系列调整,这里不在过多分析。
一般启动Activity时都会走到这里:
if (mInTask == null) {
    if (mSourceRecord == null) {
        // This activity is not being started from another...  in this
        // case we -always- start a new task.
        if ((mLaunchFlags & FLAG_ACTIVITY_NEW_TASK) == 0 && mInTask == null) {
            Slog.w(TAG, "startActivity called from non-Activity context; forcing " +
                   "Intent.FLAG_ACTIVITY_NEW_TASK for: " + mIntent);
            mLaunchFlags |= FLAG_ACTIVITY_NEW_TASK;
        }
    } else if (mSourceRecord.launchMode == LAUNCH_SINGLE_INSTANCE) {
        // The original activity who is starting us is running as a single
        // instance...  this new activity it is starting must go on its
        // own task.
        mLaunchFlags |= FLAG_ACTIVITY_NEW_TASK;
    } else if (mLaunchSingleInstance || mLaunchSingleTask) {
        // The activity being started is a single instance...  it always
        // gets launched into its own task.
        mLaunchFlags |= FLAG_ACTIVITY_NEW_TASK;
    }
}
上面这段代码主要是设置启动标识,设置Intent.FLAG_ACTIVITY_NEW_TASK的启动标识。下面几种情况设置这个标识:
- mSourceRecord == null,不是通过home上启动Activity的情况,比如用命令“am start”
- 启动目标的Activity的启动模式是singleInstance
- 启动目标的Activity的启动模式是 singleTask。我们都知道,当设置了这个flag后,要启动的Activity必须就要在新的Task中了。 继续向下分析,都是象电影一样,一个场景一个场景的。 下面的场景是mSourceRecord != null的状态。
ActivityStarter.computeSourceStack
如果mSourceRecord为null,这里会立刻返回。如果不为空,则往下进行。
这个场景下,首先判断mSourceRecord 是不是正在 finish的状态,因为这种状态下,我们就不能在把这个mSourceRecord作为源了。
如果它的flag没有添加 FLAG_ACTIVITY_NEW_TASK这个flag,我们为它手动添加一个,然后将mSourceRecord ,mSourceStack置为null. 如果mSourceRecord不是在finish状态,那么会将源所在Stack指向一个新的Stack。这主要是为后面进行task复用在做准备。
private void computeSourceStack() {
    if (mSourceRecord == null) {
        mSourceStack = null;
        return;
    }
    if (!mSourceRecord.finishing) {
        mSourceStack = mSourceRecord.getStack();
        return;
    }

    // If the source is finishing, we can't further count it as our source. This is because the
    // task it is associated with may now be empty and on its way out, so we don't want to
    // blindly throw it in to that task.  Instead we will take the NEW_TASK flow and try to find
    // a task for it. But save the task information so it can be used when creating the new task.
    if ((mLaunchFlags & FLAG_ACTIVITY_NEW_TASK) == 0) {
        Slog.w(TAG, "startActivity called from finishing " + mSourceRecord
               + "; forcing " + "Intent.FLAG_ACTIVITY_NEW_TASK for: " + mIntent);
        mLaunchFlags |= FLAG_ACTIVITY_NEW_TASK;
        mNewTaskInfo = mSourceRecord.info;

        // It is not guaranteed that the source record will have a task associated with it. For,
        // example, if this method is being called for processing a pending activity launch, it
        // is possible that the activity has been removed from the task after the launch was
        // enqueued.
        final TaskRecord sourceTask = mSourceRecord.getTask();
        mNewTaskIntent = sourceTask != null ? sourceTask.intent : null;
    }
    mSourceRecord = null;
    mSourceStack = null;
}
ActivityStarter.getReusableIntentActivity
上面执行结束会执行下面方法:
ActivityRecord reusedActivity = getReusableIntentActivity();
这个方法就要检查是否有可以复用的Task或者Activity了。
/**
     * Decide whether the new activity should be inserted into an existing task. Returns null
     * if not or an ActivityRecord with the task into which the new activity should be added.
     */
private ActivityRecord getReusableIntentActivity() {
    // We may want to try to place the new activity in to an existing task.  We always
    // do this if the target activity is singleTask or singleInstance; we will also do
    // this if NEW_TASK has been requested, and there is not an additional qualifier telling
    // us to still place it in a new task: multi task, always doc mode, or being asked to
    // launch this as a new task behind the current one.
    boolean putIntoExistingTask = ((mLaunchFlags & FLAG_ACTIVITY_NEW_TASK) != 0 &&
                                   (mLaunchFlags & FLAG_ACTIVITY_MULTIPLE_TASK) == 0)
        || mLaunchSingleInstance || mLaunchSingleTask;
    // If bring to front is requested, and no result is requested and we have not been given
    // an explicit task to launch in to, and we can find a task that was started with this
    // same component, then instead of launching bring that one to the front.
    putIntoExistingTask &= mInTask == null && mStartActivity.resultTo == null;
    ActivityRecord intentActivity = null;
    if (mOptions != null && mOptions.getLaunchTaskId() != -1) {
        final TaskRecord task = mSupervisor.anyTaskForIdLocked(mOptions.getLaunchTaskId());
        intentActivity = task != null ? task.getTopActivity() : null;
    } else if (putIntoExistingTask) {
        if (mLaunchSingleInstance) {
            // There can be one and only one instance of single instance activity in the
            // history, and it is always in its own unique task, so we do a special search.
            intentActivity = mSupervisor.findActivityLocked(mIntent, mStartActivity.info, false);
        } else if ((mLaunchFlags & FLAG_ACTIVITY_LAUNCH_ADJACENT) != 0) {
            // For the launch adjacent case we only want to put the activity in an existing
            // task if the activity already exists in the history.
            intentActivity = mSupervisor.findActivityLocked(mIntent, mStartActivity.info,
                                                            !mLaunchSingleTask);
        } else {
            // Otherwise find the best task to put the activity in.
            intentActivity = mSupervisor.findTaskLocked(mStartActivity, mSourceDisplayId);
        }
    }
    return intentActivity;
}
代码中可以看到,在不同的LaunchMode中会做findActivityLocked查找可复用Task。关于Task这边内容比较多,暂时先不梳理了。
TBC


![[转载][Linux]CentOS安装Darwin Streaming Server搭建RTSP流媒体服务器](/medias/featureimages/21.jpg)
![[Android][Framework]A/B system update](/medias/featureimages/11.jpg)